Wednesday, March 30, 2011

Popcorn Confessional

So, I’ll start this post off with a confession.

I practically have no self-control when it comes to eating really delicious popcorn.  
And it’s because of this:


My husband and I were making a late night grocery run the other night, for which I don’t get fancied up for.  ...Yes, I am one of those people you see in their PJs in Safeway at 11PM.  I slid on a pair of snow boots, threw on a hoodie and wore a black pair of workout pants I had been bumming around the house in all day.  On the way out the door my husband noticed these white powdered hand print marks on my rear end.  With an intense stare and a proud smurk, he instantly said, “HA!  I know what that’s from!”  I was intrigued because I had no idea… He continues “It’s smoked gouda cheesy popcorn fingers; you must have wiped your hands on your ass!”  

Still puzzled… I thought, how is that so? I usually do a thorough job of licking all of this smoked gouda goodness off every single digit.  Then another thought bubble appeared… Hmm, that must have been when he was coming home and I was quickly and conspicuously trying not to get caught in the act of inhaling half a bag of popcorn by myself (though he knows better, so who am I kidding). He was totally right.

I’ve never really been a big popcorn kind of person.  But this smoked gouda is addictive.  Seriously, I think I eat without blinking or breathing.  Just shoveling …and probably with both hands as evidenced by the trace marks on my booty.  

I know, I know… I am not professing to be a role model here and I realize cheese addictions are feeding my opiate receptors etc. etc., so I figured instead of talking about “balance” and “moderation” I would share 5 different ways to make a tasty, homemade popcorn snack.  We’ll have a group psychotherapy session in a later post. How’s that?

As a rule of thumb, I prefer to make my own snacks and desserts from scratch; this keeps me from buying junk and it ensures if I really want it, then I'll take the time to make it.  Also, I like knowing what ingredients I am eating, especially when it comes to fats and oils which are often cheap, rancid, flavorless and hydrogenated. Yuck, yuck, yuck and yuck.  I want high quality here and making this at home allows us to do just that.  Plus, buying popcorn from the bulk bin is inexpensive and making it is super easy. It's also pretty cool and immediately gratifying to see the little kernels burst into fluffy white clusters right before your eyes. I don't care how old you are... this is magical.   

Here are 5 different ways to spice up homemade popcorn with a basic recipe below.  Try any one of these blends or be inspired to spice up your own batch! 


  1. Spicy Mix
    • Butter
    • Sea salt
    • Cayenne Pepper
    • White Pepper
    • Black Pepper


  1. Salty Sea Popcorn
·         Butter
·         Ground kelp or nori seaweed
·         Sea salt (use less)


  1. Keeping it Light

    • Olive oil (a flavorful finishing oil)
    • Sea salt
    • Nutritional Yeast


  1. For the Italian Inside

    • Olive oil (a flavorful finishing oil)
    • Asiago
    • Parmesan
    • Romano
    • Ground garlic powder/granules

  1. Gouda and Sweet Smoked Paprika (Full recipe below)

    • Butter
    • Gouda cheese
    • Sea Salt
    • Sweet Smoked Paprika

1/2 cup popcorn kernels


***The finer the cheese is grated the better.  For soften cheeses, freezing it first may make it more manageable, but it isn't absolutely necessary.

______________________________________________________

Gouda & Sweet Smoked Paprika Popcorn!
Gouda & Sweet Smoked Paprika Popcorn
___________________________

Why microwave or buy popcorn in the bag when you have fresh, homemade popcorn at your finger tips in just a matter of minutes?  You can purchase kernels in the bulk bins of your natural foods store for around $1 per pound and then season it exactly to your taste.  Popcorn making is also great for kids to join in on the fun and watch those beautiful golden kernels burst into life right before your eyes.
___________________________

Preparation time: 5-10 minutes
Serves 2-4 people


2-3 tablespoons safflower oil (high heat oil)
½ cup popcorn kernels
3-4 tablespoons butter
½ teaspoon sea salt
1 teaspoon sweet smoked paprika
4 tablespoon finely grated gouda cheese


Heat a large skillet with 2-inch sides or a large pot over medium heat.  Add oil and then add a few of the kernels to determine when the temperature is right.  Once the first one pops, go ahead and add the rest of the kernels.  Cover with a lid and remove from the heat for about 30 seconds.  This allows all of the kernels to get coated in the oil and helps the popcorn to pop more evenly.  Place the pan back over the heat with the lid on and wait for the popping sound to begin.  Shake the pan gently and remove from the heat once you hear about 2-3 seconds between pops. 

Pour popcorn into a large bowl.  Place pan back over the heat and melt the butter.  Add the salt and paprika to the butter and stir.  Pour this mixture over the bowl of popcorn while simultaneously tossing to coat the popcorn evenly.  Add the fresh grated cheese to the butter-spiced hot popcorn so it will stick. 

Taste and feel free to add more seasonings to your liking.


Copyright 2011, S. Nester, Original recipe
Thursday, March 24, 2011

The Sunny Side Is Up

Emptiness - in my soul
I’d like to think I am strong woman who doesn’t care for complaining and always finds the sunny side of life, but there is one thing (that I’ll admit to publically at least) I have been whining about terribly these last few months: NOT HAVING PASTURED EGGS.


Surely other people cry and make the pouty face when they see a pale, yellow yolk puttering in the pan.


My husband has been consoling me with promises of our very own chickens when we move.  That helps a little.


There is some sunshine after all.  It's finally spring and eggs are in season! 
My “egg dealer” – we’ll call her mama pollo (heh heh) -- is back in business now that “the girls” (as she affectionately calls them) are laying more regularly.  So mama pollo is a friend of mine that raises her own chickens outside of the city in a suburban neighborhood.  She wanted eggs from chickens that were treated well, ate well and had good living conditions; one way to ensure that, was to do it herself. I love it.


Meet Belina – chilling on the back deck ...


Photo by T. Allen
The key to pastured chickens is that the hens have a covered place to roost and rest; fresh air, can primp and preen; and can freely forage for bugs and greens (their natural diet).  Eating bugs makes them happy.  And happy, healthy chickens lay delicious, healthy eggs.

Check out the yolk from a happy chicken compared to a yolk from a chicken in a conventional get up.


Yolk from happy chicken
Yolk from chicken in conventional outfit - "the basic grocery store egg"

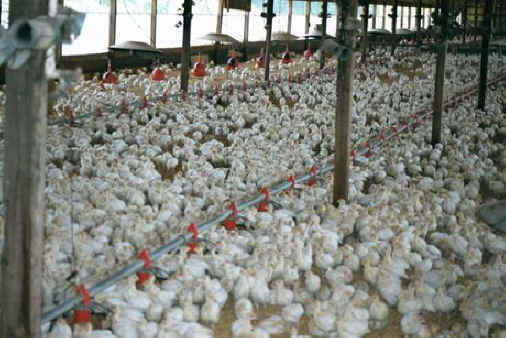
By “conventional” I mean: either factory farmed in warehouse barns (photo below) or crammed into small wire cages (called batteries) with other chickens and no room to hardly move; they are given a feed that consists of mostly genetically modified (GMO) corn (because it’s cheap) and possibly antibiotics, as they are often sickly under these conditions (geez, who wouldn’t be).  There is far more that can be said about how chickens are being factory farmed these days, but essentially, they are used soley as egg-making machines, have awful living conditions, are stressed, cranky, pissed at their neighbors and fighting all the time; less healthy, not eating their natural diet or able to roam freely as their ancestors before them once did.  This set up allows manufacturers to produce higher volumes of eggs which can in turn be sold to us at a lower cost, ~$2/dozen.

Factory Farmed Chickens / "High Density Floor Confinement" (Photo via)
Knowing this, purchasing quality eggs is one area on my grocery list that I just won't skimp on.  

And oh baby... it’s SO worth it!  Eggs from pastured chickens have a deeper and sweeter taste.  The yolks are golden in color and plump and proud in stature. 


Want more reasons to go out of your way for pastured eggs?


Pastured eggs are nutritionally superior:

·        Up to 10x more omega-3s (roles in brain/nervous system health, joint health, vision health, immune support, anti-inflammatory, etc)

·        3x more vitamin E (anti-oxidant functions, immune building, cancer preventative, preventative against CVD,  anti-inflammatory, etc.)

·        7x more beta carotene (vision health, immune function, gene expression, growth & development, etc.)

·        5x more vitamin D (immune function, nervous system, bone health, gene expression, etc.)

·        No added hormones, antibiotics or other drugs (the way it should be)
·        Less cholesterol and saturated fat (still worried about fat and cholesterol content of eggs?  Check out the: Let's Talk Fat post)
·       Rich in conjugated linoleic acid, CLA (more on CLA in a later post; you're gonna want to know about this “good fat” known for being a potent defense against cancer and more --- stay tuned!)

(Sources: Linus Paulding Institute; Eat Wild)


Ok, so how do we find good quality pastured eggs?

OPTION #1
If you know someone who raises their own chickens in a healthy environment as mentioned above,  you are golden.  And be kind to your local mama pollo.  Expect to pay $3-$5 per dozen.  Or if you are super lucky, you might have a generous neighbor who just keeps you in supply with their extras. 

OPTION #2
If you have a local farmer’s market, get there early and purchase from a local farmer that adheres to the organic pastured standards (just ask).  And of course, be kind to your local farmer as well!  Expect to pay $4-$6 per dozen.  

OPTION #3
Purchase eggs from your local natural foods market.  Read the label as best as you can looking for: organic and pastured. Expect to pay $3-$4 per dozen.  


Organic on the label means: ~80% of their feed is from non-GMO and there are no animal by-products in the feed; they have access to the outdoors year round and are allowed 2 sq ft of floor space.


Pastured on the label means: chickens are typically in a moveable enclosure where there is access to fresh growing vegetation.


But let's be clear: there are numerous words on egg cartons these days (free range, cage free, day range, free roaming, roaming free, etc).  For example: "free range" on the label doesn't necessarily mean or guarantee anything... it's loosely regulated, further making understanding egg labeling torturous and confusing --- which is why options 1 and 2 are preferred.  Rodale has a nice article on new labeling laws that may come into play making this easier on the consumer.


Here's a fantastic link that can help you find a CSA or farm in your area:
http://www.localharvest.org/

Does all this make your head spin?  Yes, mine too. Let's move on to the eating part. 

The egg is gloriously versatile and is used in baking, meringues, Italian desserts, eggnog, cocktails, stirfries; it can be scrambled, cooked over easy, poached, fried, hard boiled; you can make omelets, quiches, soufflĂ©s, frittatas, you name it!  It's a chef's delight, for sure.

One simple breakfast favorite in our house is an egg over easy/medium served over a bed of quinoa.  ...Along with some fresh ground kelp and a generous handful of cilantro (yes, we sort of like cilantro!).


Pastured egg over easy over bed of quinoa with side of fruit
But another favorite is making a frittata, which can easily make a delicious, high protein, veggie-filled meal for breakfast, lunch or dinner.  Below is a recipe for a Savory Vegetable and Caramelized Onion Frittata.  
Savory Vegetable and Caramelized Onion Frittata
So.... what is your favorite egg dish? 


And tell me I am not the only one who dreams of living in the country again ... a big yard complete with a designated chicken playground and all the fresh pastured eggs I can imagine...?


Savory Vegetable & Caramelized Onion Frittata
________________________________________________________________________

Frittatas are such a wonderful way to kickstart your day by serving up a flavorful dish, high in protein and packed with a bounty of beautiful vegetables.  For a balanced meal, partner this fabulous frittata with a side of whole grain toast and fresh, in season fruit topped with a dollop of cultured whole milk yogurt.  Feel free to change up the spices and the vegetables to suit your fancy – it’s hard to go wrong!
________________________________________________________________________

Preparation time: 30 minutes
Makes 2-4 servings (6 slices)

2 teaspoons butter, divided
½ yellow onion, sliced into half moons
4 shitake mushrooms, thinly sliced
¼ red bell pepper, julienned
2 cloves of garlic, roughly chopped
2 leaves of kale, coarsely chopped
6 eggs
3 tablespoons whole milk
¼ teaspoon sea salt
¼ teaspoon ground white pepper
1 teaspoon ground coriander
3 tablespoons coarse grated carrot
2 tablespoons fresh chopped parsley, plus more to garnish
1/3 cup grated mild cheddar cheese


Set oven to broil.

Heat a medium-size stainless steel pan over medium heat.  Add 1 teaspoon of butter.  Add the onions and cook for about 15 minutes until they are almost caramelized.  Add the mushrooms and bell pepper.  SautĂ© together for 3-4 more minutes.  Add the garlic and kale and cook for another minute or so until kale turns bright green and begins to wilt.  remove from heat and set mixture aside.

Whisk eggs and milk together in a medium size bowl.  Mix in the salt, pepper and coriander.  Over medium-high heat, re-heat the same pan that was used to cook the vegetables and coat evenly (especially around the sides) with the remaining teaspoon of butter.  Add the egg mixture and cook about 75% of the way without stirring; there will still be uncooked yolk on the top. Add the cooked vegetables and then top with the carrot, chopped parsley and cheese. 

Place the skillet in the oven to broil for about 3-4 minutes, until the cheese is a little golden and bubbly.  Keep an eye on it so it doesn’t burn  Remove from the oven, slice into 6 pieces and serve garnished with a little extra parsley.


Copyright 2010, S. Nester, Original recipe

Tuesday, March 8, 2011

Keen-what??

"Quinoa."

"Keen – what??"

Repeat.

Most people have not heard of the whole grain, quinoa, pronounced “keen wah.”  And the above is basically how that conversation goes.  Attempting to spell it doesn’t really help much either.  People look at me like I am speaking kung fu. 

Some people are more health savvy and this is old hat, especially Pacific North Westerners.  I’ve yet to meet someone here who has not heard of quinoa; although in all fairness, most of the quinoa we get in the US is grown west of the Rockies; it was only really introduced to North America in the early 1980s.  However for many of us, this glorious grain is still quite new to our palates.  

Just 4 years ago, I had never heard of it and now, we make it practically every week; it's one of the darlings of my kitchen.

Now that I think back, the first time I had ever heard of this legendary whole grain goes a little like this: 

I was visiting family on Long Island, NY.  I was with my grandma…who by the way is quite the catch… a salsa dancer, lover of red wine, cycles centuries, beautiful…she likes to go on bike rides and jogs with her kids and grandkids so we can eat her dust. I’m not lying, ask any one of us.  And she does indeed have rocking calves, which you can’t help but notice while choking on pebbles and dodging the pavement she is kicking up… Ok, I’m with my hot grandma, with two of her wonderful friends, out on a boat on a gorgeous summer day in Massapequa; her friends have a friend who was visiting from Florida… He was a super neat guy who left Wallstreet to pursue his passions of being a cycling instructor and a chef in a Latin Fusion restaurant in Miami.  I remember asking him what his favorite thing to cook was (because for some reason, I always ask people what their favorite things are… why do I do this??)  He says, “Quinoa.”  I say: “keen – what??”  And repeat.  I had never heard of this food this guy was talking about. In fact, I wasn’t even convinced it existed.  I smiled like wow… and thought this dude is making this up.  Or he lives on the edge eating this fancy food that probably no one else has heard of.  This was only 2007.  (My, I’ve come a long way.)

History
Native to Peru, quinoa has been around for thousands of years.  It’s an ancient grain, held sacred and cherished first by the Incan Indians; it was their “mother grain," affectionately known as “chisaya mama.”   For the record, it’s actually a seed, but it makes all our lives easier just to call it a grain since we use it like one, so let’s go with it.

I am always fascinated by foods that are strong and durable, able to grow in any conditions.  Quinoa is like that; it can grow in poor soil, high altitudes, cold air and in the heat of the sun.  Energetically, I believe that imparts a similar strength to us, making it an even richer food source then just its nutrient offering.  It’s drying and warming, which is another reason I can see why it’s a beloved grain of North Westerners during our cold, rainy seasons.

Here’s what it looks like growing… beautiful isn't it?
Photo via

Here's what it looks like uncooked
Photo via


And, here's what it looks like cooked; it fluffs up 3x its size and shoots out these little curlicues
Photo via

Where can I buy it?
Definitely natural markets, however, most grocery stores are carrying it these days.  I find it’s much cheaper and fresher in the bulk bins so always look for it there.  You may even run across black or red quinoa.  Those are just as nutritious and have a slightly different flavor.  Go crazy.

How do I store it?
Store it in an airtight container in a cool, dry place.  It will keep for up to 3-6 months.  I keep mine in a mason jar in my pantry.  Actually, there is a picture of my exact mason jar filled with quinoa on the top left, the "home" jar.

Here are several reasons to meet quinoa and make it a part of your weekly menu or appreciate it all the more if you already eat it:
·         It’s convenient --- in 15 minutes, you have a tasty and healthful whole grain ready to go
·         It’s a complete protein containing all essential amino acids; no other grain can tout that profile
·         It’s especially high in lysine, an essential amino acid that helps with tissue growth and repair
·         It's a budget-friendly way to make a balanced meal with a vegetarian protein source
·         It’s also a good protein to prepare in advance and pack for backpacking and camping trips
·         It’s also high in iron and calcium (two seriously lacking nutrients in the American diet), as  well as B vitamins and other nutrients
·         It’s easy to digest
·         It’s an excellent addition to an anti-inflammatory diet
·         It’s gluten-free and should especially be a staple in the diets of those who can’t have  wheat gluten or who are celiacs
·      It's very versatile and can be used in savory or sweet dishes
·         It has a fabulous taste and distinct texture

How do I cook it?  
Oh, glad you asked.  A simple recipe is below, which you’ll soon commit to memory… and then you’ll be making it like a pro in no time! 

P.s. 
It’s a good habit to rinse the quinoa before cooking in case there are any bitter saponins left on it.

I’ll post more quinoa recipes in the future, but for now, I wanted to get the basic recipe out.  Be creative with it and use it however you like.  Feel free to drop a comment and share what’s your favorite way to have quinoa.  (See, here I go wanting to know your favorites. I can’t help myself.)

Simple Quinoa
___________________________

This ancient Incan grain is a must-have in every home pantry. It’s gluten-free, easy to digest, a complete protein, has a fabulous texture and delightfully nutty, earthy flavor. You can cook it in water, stock or any other infused liquid of your choice.  This versatile grain is ready to go in 20 minutes and serves well by itself as a side, in soups, salads, casseroles, under stir fries, eggs, you name it.
___________________________


Preparation time: 15 minutes
Yields 3 cups

1 cup quinoa
1¾ cup liquid
½ teaspoon sea salt

If you’d like a nuttier flavor, you can dry toast the quinoa in a skillet over medium-high heat.  It will turn golden, begin to pop a little and give off a nutty smell in about 3 minutes or so.  Shake the pan around to make sure it doesn’t burn.  You can skip this step if you’d like.

Combine all ingredients in a pot and bring to a boil.  Cover, reduce heat to low and simmer for 15 minutes.  As with any grain, do not stir.  To check if the quinoa is ready, tip the pot to the side. If all liquid is gone, it’s ready.  Remove from the heat and remove the lid.  Allow it to rest for 5-10 minutes.  Fluff with a fork and salt to taste.  Serve and enjoy!


Copyright 2010, S. Nester, Original recipe

Tell me what's on your mind!

Click the comments link below the post to share your thoughts.