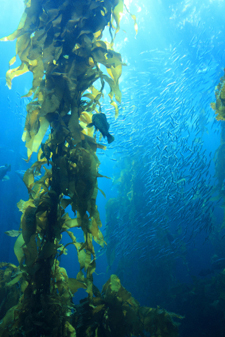
Tuesday, July 26, 2011

I Got Seaweed Fever

Wakame (photo via)

And you know what I need?  No, not more cowbell (although that would definitely be my second choice).  I need to get out in the pristine waters of the San Juans and harvest my own kelp.  I have a trip planned to Lopez Island (Washington state) in less than 2 weeks and I’m itching like crazy to get in my kayak, to sit on the moving, cold pacific waters in the midst of ancient kelp beds and to just breathe the salty air.  There is something extraordinary and transcendent about being in the presence of living seaweed and connecting to such a life-giving force.  

For now, I’m fixing my itching by making Ginger Wakame Crisps (recipe below).  Wakka what?  Pronounced "wok-uh-may," this glorious sea treasure is a deep, richly green colored kelp (though actually in the brown algae family: Undaria pinnatifida).   

Wakame is just one of many varieties of seaweed. You might have seen it in miso soup since it is traditional to Japanese cooking and culture.

What’s the big deal about seaweed?

Glad you asked.  It’s a huge deal.  It’s been prized and eaten for literally thousands of years as a powerful, sustainable, medicinal and tasty food source.                                                                                                                                                                                                    
Here's why:

  • Mineral density!  Think of minerals when you think of seaweed.  Seaweed contains ALL the minerals the body needs for hundreds of vital biochemical pathways that take place every single second: calcium for bone health and cell signaling; iodine and selenium for thyroid function; iron for oxygen transport and energy metabolism; sodium and potassium which are essential for electrolyte balance --- just to name a few!
  • It’s an excellent detoxifier.  Seaweed contains alginic acid, which has the remarkable ability to bind toxic heavy metals and other toxins (like dioxin) so they can be excreted and not absorbed by our tissues; heavy metal toxicity places an enormous burden on our bodies and is the source of a lot of dysfunction and dis-ease at the cellular level.
  • Helps prevent cancer and tumor growth. For the reasons listed above, but especially for colon and estrogen-related cancers like breast cancer; however if a patient is undergoing chemo or radiation therapies, incorporating brown seaweeds into the diet are a must for ongoing support.
  • It’s anti-viral, fighting off viruses that can penetrate and infect our DNA, like HIV and Herpes (both I and II).
  • Great plant source of B vitamins, especially B12: important for everyone, but definitely vegans and vegetarians who have to be mindful about getting enough B12 in their diets. 
There are just a few of my favorite therapeutic benefits, but also keep in mind that seaweed is a powerful antioxidant, rich in both phytonutrients and fucoidan compounds, additionally making consuming seaweed especially good for:

  • Boosting the immune system
  • Growth of shiny, healthy, hair, nails and skin
  • Weight loss
  • Heart health (as an anti-coagulant)
  • Controlling blood sugar and lowering the risk of Type II Diabetes
  • Quelling inflammatory conditions in the body (your guts, your joints)
Who wouldn’t want those benefits?  Let me assure you that as much as I love the medicinal profile of seaweed, I would not make a whole dish out of it if it didn’t taste good!  

I challenge you to go to your natural foods market (or visit Eden Foods) to purchase dried wakame and make this dish.  You may be completely surprised by how easy it is to toss back a handful of this crispy, subtly sweet, salty treat.  If you aren’t feeling quite so bold but really want the medicinal benefits of seaweed, stay tuned for the next post on seaweed for a tip that makes eating seaweed easy for any palette.  If you have a sensitive gut, it’s not a bad idea to start slow to allow your body time to assimilate a new food.

And finally, I wrote up this recipe a few months back and am dedicating it to one of my dearest friends, Siona.  Within a week of first meeting her a couple years ago, she shared this pearl, this gospel of good news, this thing called, kombu: seaweed.  I was in awe.  And I remember the exact moment of this first introduction because it was a gift of knowledge that had been imparted, that resonated with my passion for whole food and food as medicine.  We were taking a walk near Waverly Beach Park in Kirkland, WA as we admired the beauty of the lake and the glimpse of the space needle in the distance.  Since then, I have harvested it myself, researched in depth the many varieties, nutritional and medicinal properties and cook with it several times a week in my home.  This friend and I marvel together over our love for this sea treasure, just as much as we marvel over rich, creamy, full-fat, good, quality ice cream. 

For some, seaweed or sea vegetables is nothing new.  You’ve had sushi wrapped in nori, or miso soup with shreds of wakame in it, but for many Americans, seaweed is not a part of our regular diets.

It should be. 

I am so grateful for gaining a deeper understanding of this powerful food and so now I impart this to you!

1/2 cup of dried wakame (right) with same amount hydrated (left)

There are numerous varieties with a range of flavor profiles, so try a few different kinds and see what you like.  …more on seaweed harvesting, sustainability and ways to use seaweed everyday in a future post.  

Any seaweed questions, post ‘em up!  Whose got a fever?


Ginger Wakame Crisps
__________________________________________________________________ 
I made these mineral-rich, ginger and sesame-spiced seaweed snacks in honor of one of my dearest friends, Siona Sammartino, who lives, breathes and dreams seaweed!  There is a lovely little restaurant called Nettletown that is nestled away in the Eastlake area of Seattle; it happens to be one of our favorite places to frequent especially because of the crispy seaweed appetizer on the menu.  You can serve this as a unique and tasty appetizer, a topping for salads, Asian noodle dishes or simply enjoy it as a salty snack.
__________________________________________________________________ 


Preparation time: 40 minutes
Serves 4

½ cup dried wakame
¼ cup coarse grated ginger root
2 tablespoons toasted sesame oil
1 teaspoon tamari
1 teaspoon brown rice vinegar
Pinch of white pepper (optional)


Pre-heat oven to 350°F.

To re-hydrate wakame, place it in a medium size bowl and cover with plenty of water for.  Let the seaweed set for 5-10 minutes while you prepare the dressing.  It will grow at least 5 times in volume. 

In a small bowl, squeeze the juice from the grated ginger using your hand to wring out every last bit.  Discard the pulp.  Add the oil, tamari, vinegar, white pepper and stir. 

Drain the wakame and a use a towel to gently blot the seaweed to soak up as much water as possible.  Pour the liquid mixture over the hydrated seaweed and carefully toss to coat.  Spread half of the wakame on a large baking sheet making sure to not leave clumps so the heat can circulate and make them nice and crispy.  Bake for 15-17 minutes, or until the seaweed crisps up.  Use a spatula to remove the wakame crisps from the pan and place on a plate lined with paper towels.  Repeat for the remaining half of seaweed. Enjoy!
  

Copyright 2011, S. Nester, Original recipe
_____________________________________________________________________________


***Note: If you have a hyperactive thyroid or are concerned about iodine content in seaweed, talk with your physician before consuming seaweed on a regular basis.  Wakame specifically contains 50-150ppm of iodine. 

Sources:

Thursday, July 14, 2011

Vanilla Chamomile Kudzu Pudding

Ok, admittedly, this recipe seems more like a winter treat.  It’s supposedly July in Seattle, but not really. I mean what the heck is up with summer?  It came late, sort of said hello for a day or two, went away and came back for a second --- all of which is debatable and is subject to change depending on who you talk to.

Anyway, who knows what’s up.  What I do know is, if the season can’t make up its mind, then a bit of a warming dessert in mid July isn’t totally off the mark.   All in all, this pudding is comforting and after a long day, it totally hits the spot. 

So, I have a thing for infusing teas into desserts.  I especially have a thing for chamomile.  By that I mean, I am unendingly impressed with both its flavor and medicinal profiles.  Therapeutically, it:   

·         soothes and comforts
·         relieves insomnia and eases tension in the body
·         calms frazzled nerves and melts away the stress and anxieties of the day
·         strengthens the immune system
·         supports digestive health (including nausea or upset stomach)
·         can be used topically for sunburn

Speaking of which, I got awfully scorched (understatement) by the sun a couple weeks ago while in Montana.  I sort of took a little nap on a lounge chair on the back deck.  To my defense, that bright, glowing thing in the sky had been foreign to me for so long that I kind of forgot that I could get so badly burned by it.  Chamomile is one herb I like to keep in my first aid kit for such times as these because of its super anti-inflammatory and soothing properties. 

And, chamomile tastes just lovely.  Actually, it’s said to be reminiscent of apples.  I found this out last summer while moseying through the culinary herb beds at my local farm.  A very sprightly 10-year-old boy standing next to me gleefully plucked off a fresh chamomile flower and popped it into his mouth.  He turned to me and commanded, “Here, try one.  They taste just like apple pie!”  I’m thinking, who is this confident kid that goes around eating plants persuading strangers to do the same all while making claims that they taste like all-American desserts?  I accepted his offer… mostly because I had a feeling I would have felt terribly uncool if I didn’t.  I closed my eyes and waited for the aroma or something apple, anything apple. I wanted him to be right.  He was!  It did indeed have a unique, sweet flavor that sang a little like a warm apple. 


You get the idea. Chamomile is special --- a must-have herb in the home medicine cabinet and the home pantry.

Cinnamon sticks, dried chamomile flower and vanilla bean
This recipe is soft and mellow, though overflows with the flavors of vanilla, chamomile and cinnamon, all of which are kings in their own right when it comes to the essential oils they bear.  However, the real medicinal superstar of this dish is the kudzu root, pronounced kud– zoo.  Similar to chamomile, kudzu is also extraordinarily therapeutic.  It too relaxes tense muscles and supports digestive health. 

Kudzo root
It’s a highly respected root of a noxious weed and has been appreciated for hundreds of years, most notably in Traditional Chinese Medicine.  It’s also good for hangovers, headaches and is said to help alcoholics with withdrawal.  

In this recipe its other functional role is that of a thickening agent and makes this pudding, well pudding-y.  Look for this chalky root in your natural food markets. You can use it in place of corn starch and arrowroot to thicken sauces, pie filling and soups too. 

Be sure to get the cinnamon sticks and vanilla bean from the bulk spice section of the store.  There is no comparison to fresh, whole spices.  


Actually, when I first made this recipe, I put the whole cinnamon stick in the milk and let it infuse for a little while.  (The recipe below doesn’t include this step and has been shortened to save time.)  I didn’t want to just throw it away when I was done with the dish, so I chewed on the deliciously spicy, milk-soaked cinnamon stick for a little while to savor it just a little longer --- much like a country boy from Virginia would do with a toothpick after a good solid meal from Cracker Barrel.  (Anyone from VA reading this?… you know what I mean!)  Of course, I haven’t perfected the skill of vertically flipping the cinnamon stick with my tongue.  Yet.

Treat yourself and some loved ones to this Vanilla Chamomile Kudzu Pudding as a calming and comforting evening dessert to help unwind from the day and settle in for the night. You can serve it chilled, but I particularly enjoyed it warm.  It’s a pretty simple recipe though make sure you fully dissolve the kudzu first in the cooled tea and whisk constantly once you add the slurry to the warm milk in order to prevent the kudzu from clumping.


Vanilla Chamomile Kudzu Pudding

___________________________________________________________________________________________

Calming and comforting, this pudding is a sweet and lovely evening dessert.  Kudzu root is a fantastic thickening agent, but better yet, it has an extraordinary range of medicinal benefits from acute pain relief to a soothing digestive aid.  Serve warm or chilled, but definitely don’t leave out the freshly ground cinnamon!
______________________________________________________________


Preparation time: 25 minutes
Makes 4 6-ounce servings or 6 4-ounce servings

2 tablespoons dried chamomile flowers
1½ cups boiling water
3 cups whole milk
3-4 tablespoons sucanat, ground
½ vanilla bean pod, split lengthwise
Pinch of sea salt
1 cinnamon stick, ground
3 heaping tablespoons kudzu root

Make a strong tea by steeping the chamomile in the hot water for 10 minutes.  Cover tea with a small plate so the essential oils do not escape.  Strain out the chamomile flowers and set the tea aside to cool. 

Pour milk into a heavy-bottomed pot and bring to a gentle simmer.  Add sugar and whisk to dissolve.  Scrape the vanilla bean seeds into the pot.  Toss in the vanilla bean shell, the salt and half of the freshly ground cinnamon.  Continue to simmer for 2-3 minutes to infuse the flavors.

Meanwhile, crush the kudzu root using a mortar and pestle or with the back of a spoon.  Combine about 1/3 cup of the cooled chamomile tea with the kudzu root and whisk with a fork to dissolve and create a slurry.  Fish out the vanilla bean from the warm milk.  Add the kudzu slurry and whisk continually for about 5-10 minutes while still cooking over gentle heat.  Do not stop whisking or the kudzu will gel and clump.  Pudding will begin to thicken and will continue to do so as it sits.   Pour warm pudding into 4 6-ounces ramekins (or 6 4-ounce ramekins).  Garnish the tops with the remaining ground cinnamon.  


Copyright 2011, S. Nester, Original recipe


Friday, July 1, 2011

Give your liver some love – with homemade root beer!

This one is for all the root beer lovers out there.
And besides, how often do you hear about beer as a liver tonic? 

When you combine aromatic sassafras root with the creamy vanilla sarsaparilla root, you not only get that familiar taste of root beer but you also benefit from the medicinal perks that come along with these earthy treasures.  Reduce that decocted tea with some sugar into a syrup and combine with your favorite sparkling natural mineral water, and bam: you have homemade root beer!  Pretty simple, right?


My friend Brian inspired this recipe.  He made a really delicious brew with devil’s club that he served at Bastyr’s Herb and Food Fair this past June.  This guy has a gift with herbal preparations and when he gets his hands on herbs, magical things happen.  His unique devil’s club recipe is below.  You may want to scale it down, but can generally follow the same steps as my recipe at the end of this post. 

I swoon over homemade root beer.  I’m not going to lie. The taste is nostalgic for me, especially if you combine it with vanilla bean ice cream, which is why I made my own root beer a little heavy in the sarsaparilla and added the fresh vanilla bean pod.  But, don’t let that stop you from adding a scoop (or three) of ice cream for a float. 

I am even more charmed by root beer knowing that this is a drink that has been made for centuries, for both flavor and its therapeutic power.  I certainly hope that when I have kids, they know the rich and perfect taste of these sweet roots before they know what the heck “A&W” is. 

Sassafras

Vanilla Bean

This is a “small beer” recipe with no alcohol content or caffeine; however, you can absolutely ferment this to make a batch of a "strong beer" with alcohol if you’d like.  Sassafras root is the key ingredient that attributes to that familiar root beer flavor.  Other than that, you really can tweak and play with the other ingredients to your heart’s content.  Other common ingredients include: birch bark, allspice, ginger, hops, dandelion root, juniper and wintergreen.  

Sadly, most root beer today has severely deviated from its true roots.  Yes, pun totally intended.  So just for kicks, here are the ingredients in A&W root beer you can buy off the shelf today: Carbonated water, high fructose corn syrup and/or sugar, caramel color, sodium benzoate (preservative), natural and artificial flavors.

No doubt it definitely takes more time to make root beer than to purchase it from the store, but you have to try it at least once and appreciate that these original flavors grow right outside in the woods around us.  


Sassafras in particular is a species of laurel that is native to North America and commonly grows in Virginia. You can bet I’ll have some of those trees in my yard.  And I’ll likely be the estranged neighbor that the town folks talk about… the one who makes beverages and such from the tree bark in her front yard.  “That smiley lady is sniffing the tree bark again…”  


My long time friends will likely shrug their shoulders and just love me anyway.  My in-laws already think I’m pretty weird.  Though if all else fails, I at least know some of my buddies in Seattle will come visit me and share a toast together on my front porch. 
Homemade root beer.  I forgot to strain out the vanilla 
bean in this batch, but the little bits on the brim of 
my glass ended up being my favorite part.


Where does the liver-loving come in?  Right here.
Sarsaparilla (Smilax spp.) not only offers this vanilla cream flavor but has a high mineral content along with antibiotic and anti-inflammatory actions.  The saponins in the bark also have a detoxifying function and help to cleanse the body of toxins. 
Sassafras (Sassafras albidum) provides the traditional root beer flavor which you can quickly identify the moment you take a breath of the dried bark.  This plant is a nutritive and restorative one that loves all your organs, but has a special affinity for the liver. It cleanses the blood, flushes toxins from the system and is used medicinally for clearing skin conditions as well as arthritic and rheumatic conditions. 
Milk thistle (Silybum marianum) is added for its liver protective and potent fighting effects.   
Anise seeds (Pimpinella anisum) deliver a sweet, fennely flavor and the essential oils act to support digestion, relieving gas and bloating (a carminative).
Licorice (Glycyrrhiza glabra).  While not in large proportions, licorice no less contributes a subtle, natural sweetness to the mix; it also adds its soothing, anti-inflammatory qualities along with gentle support to the adrenal glands. 
Lemon peel.  I just like it in my root beer for a quiet lift in the backdrop. 
Here’s a quick list of ingredients for Brian’s Herbal Root Beer.

2 ½ cups sassafras 
1 cup devil's club
1/2 cup milk thistle seed
¼ cup anise seed
32 cups of water
6 pounds of sugar
Seltzer water

And here’s my homemade brew. 
Homemade Root Beer
__________________________________________________________________________

My friend Brian is a master herbalist and makes a fantastic root beer with devil’s club.  His home brew inspired me to remake my favorite soda with my own spin on it; a vanilla cream flare that reminds me of root beer floats.  This is a fairly simple decoction of dried herbs, seeds, roots and sugar that can be made on the stove top.  Combine this strong syrup with sparkling natural mineral water and it serves as a familiar treat as well as a liver tonic.  Enjoy!
__________________________________________________________________________


Preparation time: 15 minutes plus 2 hours to decoct the herbs


Yields 3 cups of syrup / ~16 8 ounce servings of root beer


8 cups filtered water
1 cup sassafras bark
½ cup sarsaparilla bark
2 tablespoons milk thistle seed
1 tablespoon licorice root
1 tablespoon anise seeds
1 tablespoon dried lemon peel
1 vanilla bean pod, sliced open lengthwise

3 1/2 cups organic unbleached sugar or sucanat (or a combination of the two)
Sparkling natural mineral water such as Gerolsteiner or San Pellegrino


Combine all ingredients except sugar and mineral water into a large pot.  Simmer over medium heat for 2 hours.  Strain the decoction reserving the liquid and composting the used herbs.  Pour the liquid back into the pot and bring it to a boil.  Add the sugar and continue to cook liquid over medium heat to reduce into a strongly concentrated syrup, about 3 cups.  Remove from stove and cool. 

Add 2-3 tablespoons of syrup to a glass with ice along with 8 ounces of sparkling natural mineral water and serve immediately.  If not serving all at once, syrup should be stored in a sealed jar in the fridge for up to 1 week and prepared right before planning to drink.  


***Sugar can be adjusted to taste.  


Copyright 2011, S. Nester, Original recipe 

Cheers to a healthy liver while sipping on homemade beer!

Tell me what's on your mind!

Click the comments link below the post to share your thoughts.